If we're overwhelmed and short on time, learning how to use Midjourney can feel like one more complicated tool to figure out. The reality is that once we understand a few key commands and settings, Midjourney v6 becomes a fast, reliable way to create photorealistic images and surprisingly accurate text for real-world projects.
In this guide, we'll walk through exactly what we need before starting, the 5 commands we'll use every day, and a step‑by‑step workflow to generate, refine, and export images in under 10 minutes. This article is written and tested for Midjourney v6 on Discord, tested as of December 2025. Details may change, so we'll also link to official resources where needed for up‑to‑date checks.
What You Need Before Starting Midjourney v6 (2025)
Before we jump into how to use Midjourney in real workflows, we need three basics: a Discord account, a paid Midjourney plan, and access to the correct Discord server.
Discord Account Setup (2 Minutes)
We don't need to love Discord, we just need it working.
-
Go to discord and create a free account.
-
Download the desktop app (recommended for heavy use) or use the browser version.
-
Verify our email and enable two‑factor authentication if possible. This matters if we're working with client assets.
Once we're logged in, we're ready for the Midjourney server.
Subscription Plans: Which One for Beginners?
As of late 2025, Midjourney no longer offers a true free tier. We'll need a subscription from Midjourney account.
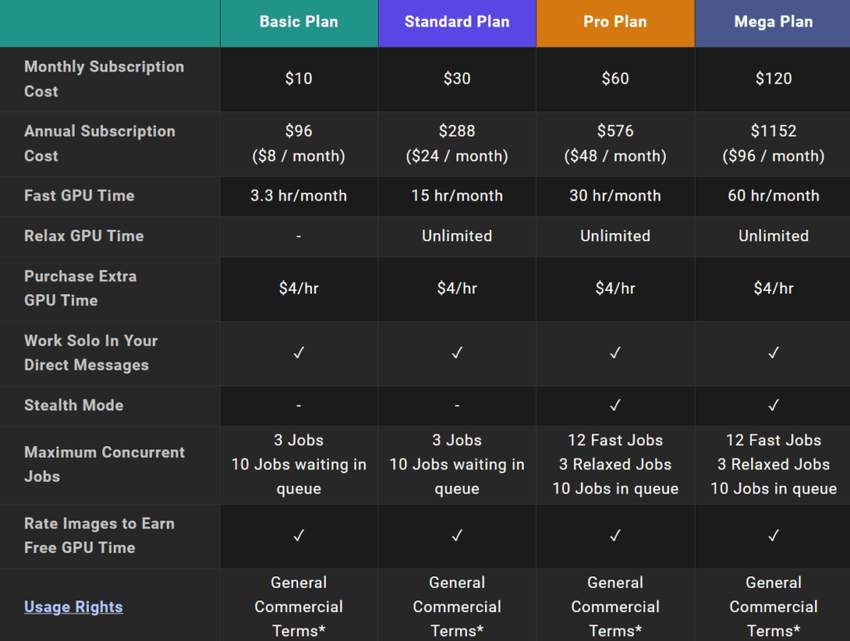
For most independent creators, the Basic or Standard plan is enough:
-
Basic – Good if we're testing or doing a few images per week.
-
Standard – Better for regular content, social graphics, thumbnails, and small campaigns.
If we're producing large batches for e‑commerce, agencies, or print assets, the Pro plan is worth considering for more fast GPU time and privacy features.
Finding Your Midjourney Server
Once we've subscribed:
-
Visit Midjourney and click Join the Beta or Open in Discord.
-
Discord will open the Midjourney server in the left sidebar.
-
Inside the server, we'll see channels like #newbies-###, #general, and sometimes feature‑specific channels.
We can already see why people feel lost: everything happens inside chat. But once we know which channels and commands to use, it becomes a predictable workflow instead of chaos.
5 Essential Midjourney Commands You'll Use Every Day
Here's where it gets interesting… even though the intimidating interface, we really only use a handful of commands daily.
/imagine - Your Starting Point
/imagine is how we tell Midjourney what to create.
-
In any allowed channel, type /imagine and a prompt field appears.
-
Describe what we want: a photorealistic product photo of a matte black coffee mug on a white background, studio lighting.
-
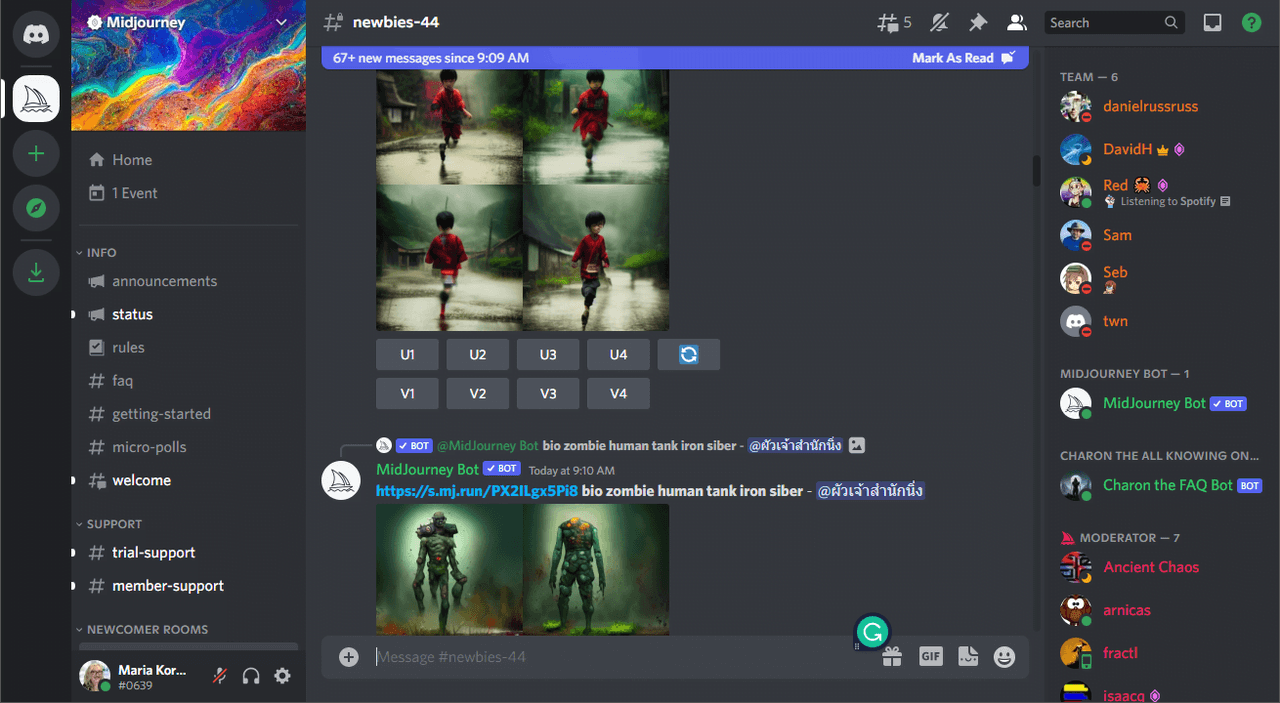
Hit Enter. Midjourney generates a 2x2 grid of four options.
This single command powers 90% of how we use Midjourney.
/settings - Customizing Your Workflow
/settings opens a visual panel of toggles and options:
-
Model version (v6, v5.2, etc.)
-
Style settings
-
Remix mode
-
Upscale preferences
We type /settings once, configure it, and Midjourney remembers our choices. This is where we make v6 our default and adjust quality vs speed.
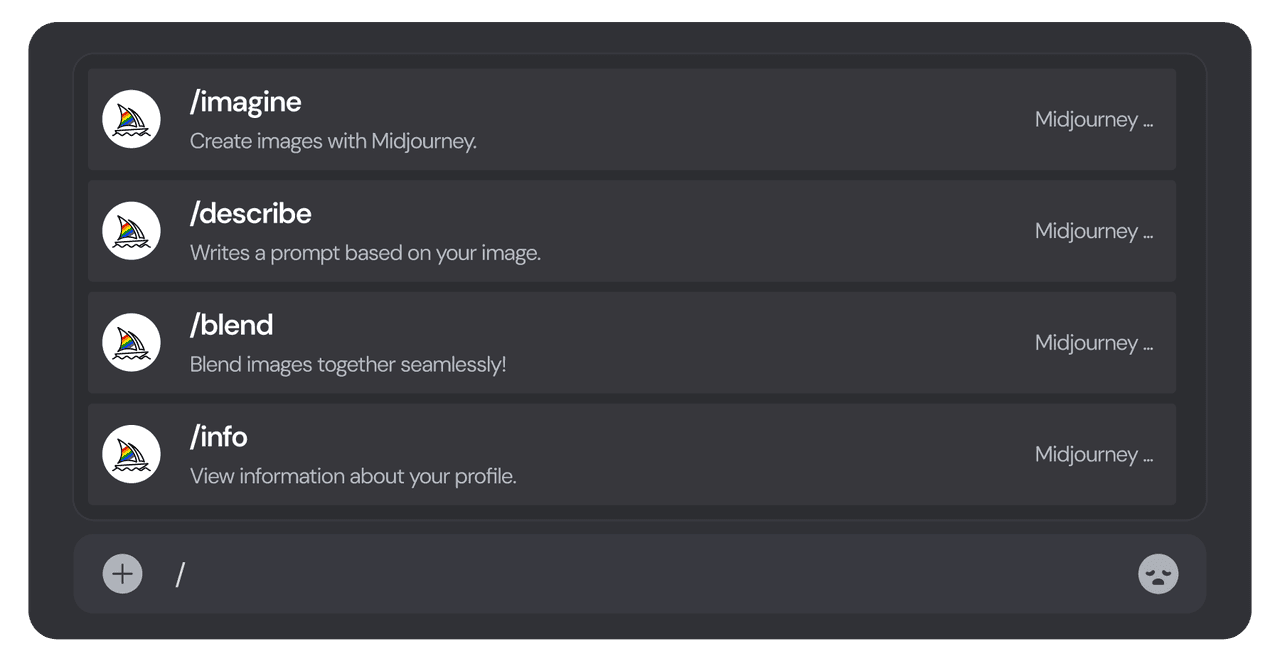
/blend, /describe, and /info Explained
These three commands are underused but powerful in real workflows.
-
/blend – Upload 2–5 images and let Midjourney merge them into a new concept (useful for moodboards or combining styles).
-
/describe – Upload an image, and Midjourney generates text prompts describing it. Great for reverse‑engineering looks we like.
-
/info – Shows our account type, remaining fast hours, and the parameters used in our last jobs.
We'll rely on /info to track usage and copy good prompt settings later.
Why These Commands Matter (Real Example)
Imagine we're a marketer designing Instagram ads for a coffee brand:
-
We use /imagine with a detailed product description.
-
We tweak global behavior once with /settings (v6, high quality, square images).
-
We blend a lifestyle shot and a product shot with /blend to find a new angle.
-
We study a competitor's photo with /describe to understand the lighting and style.
-
We check our GPU time with /info before a big batch run.
That small set of commands becomes a repeatable, stress‑free workflow instead of random experimenting.
How to Write Midjourney Prompts That Actually Work
Most of us struggle with Midjourney not because we don't know how to use Midjourney, but because our prompts are vague. v6 is more literal and text‑aware than earlier versions, so clear structure matters.
The 3-Part Prompt Formula I Use
We can keep it simple with this 3‑part formula:
Subject + Style / Context + Technical Details
Example:
"branding mockup of a minimalist coffee bag on a wooden table, soft morning window light, photorealistic, 8k, high detail, product photography"
We're telling Midjourney what the thing is, how it should feel, and how polished it should be.
Subject + Style + Quality Parameters
Let's break that formula down:
-
Subject – The main focus: coffee mug, SaaS dashboard, skincare bottle, streetwear model.
-
Style / Context – Photography type, mood, environment: studio lighting, cinematic, lifestyle, overhead flat lay.
-
Quality Parameters – We can add:
-
--ar 16:9 for widescreen
-
--v 6 for Midjourney v6
-
--stylize 100 for a bit more flair
We usually append parameters at the end: ... soft studio lighting --ar 4:5 --v 6.
Common Beginner Mistakes (and How to Fix Them)
-
Too short: a logo. Instead: "minimalist logo for a modern coffee brand, flat design, dark green and cream".
-
Conflicting directions: "hyper‑realistic watercolor 3d icon" – pick 1–2 main styles.
-
Forgetting aspect ratio: social posts usually need 4:5 or 1:1, YouTube needs 16:9.
-
No subject priority: if text matters (like packaging), mention it early: "product photo focused on the label text…".
Midjourney v6 is better at reading natural language, but it still rewards clarity and hierarchy.
5 Starter Prompts You Can Copy-Paste
Here are five prompts we can try right away (all assume v6):
-
a photorealistic product photo of a matte black coffee mug with steam, on a white seamless background, studio lighting, sharp focus --ar 4:5 --v 6
-
youtube thumbnail showing a smiling designer at a desk with dual monitors, clean modern workspace, bold title text on the left saying "AI Design Workflow", bright and colorful, cinematic lighting --ar 16:9 --v 6
-
flat lay of skincare products on a marble surface with water droplets, soft natural daylight, minimal aesthetic, for instagram, high detail --ar 4:5 --v 6
-
isometric illustration of a SaaS analytics dashboard on a laptop, clean UI, pastel colors, modern tech style --ar 16:9 --v 6
-
streetwear fashion photo of a model in an oversized hoodie and sneakers, urban city at night, neon signs, shallow depth of field, editorial style --ar 2:3 --v 6
We can paste any of these into /imagine and then tweak to match our brand or client.
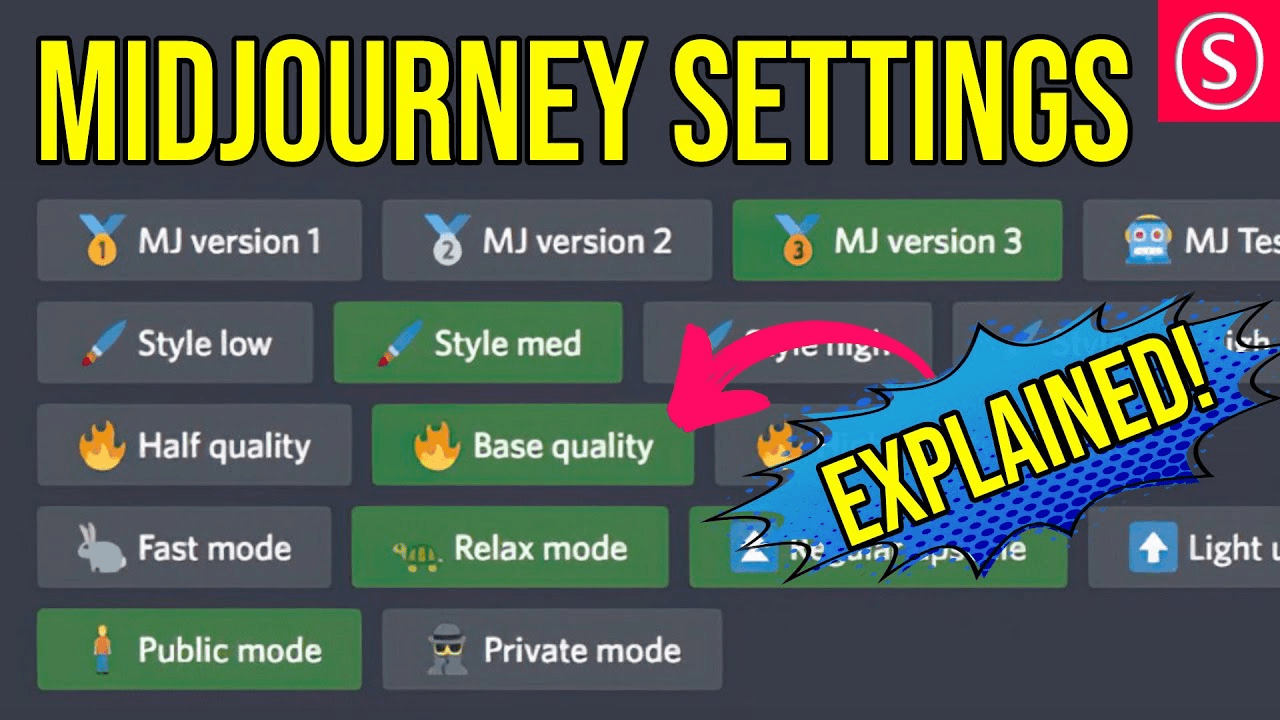
Midjourney Settings Guide: What Each Option Does
Type /settings in any Midjourney channel and we'll see a clickable menu. This is where we control how the model behaves.
Model Version Selection (v6 vs v5.2)
As of December 2025, we'll typically see at least:
-
Midjourney v6 – Best for photorealism, text rendering, and general accuracy.
-
v5.2 – Slightly more stylized and "painterly", sometimes nicer for illustration or concept art.
For client‑facing imagery and anything involving readable words, v6 is usually the better choice. Official version notes are listed on Midjourney's Discord announcements and summarized on the Midjourney documentation.
Aspect Ratios and Image Dimensions
Aspect ratio is controlled with --ar:
-
--ar 1:1 – Square (good for profile images, some feeds)
-
--ar 4:5 – Ideal for Instagram posts
-
--ar 16:9 – YouTube thumbnails, web banners
Midjourney automatically decides pixel dimensions based on the ratio and model, but we don't usually need to worry about exact sizes until export.
Stylize, Chaos, and Weird Parameters Decoded
In v6, the style controls are more subtle than before, but conceptually:
-
--stylize – How strongly Midjourney adds its own artistic flair vs following us literally.
-
--chaos – How varied and experimental the four initial options are.
-
--weird – (If available) pushes designs into stranger, more unexpected directions.
For commercial work, we often keep stylize moderate, chaos low, and avoid weird unless we're exploring concepts.
My Recommended Settings for Different Use Cases
Here's a quick starting point:
-
Product photos / ads: v6, --stylize 50–100, --chaos 5, appropriate aspect ratio.
-
Concept art / moodboards: v6 or v5.2, --stylize 150–300, --chaos 20.
-
UI mockups / diagrams: v6, low stylize (20–50), low chaos (0–5).
We can refine from there as we see how the outputs look in our own workflows.
Step-by-Step: Generate Your First Midjourney Image (7 Minutes)
Let's walk through a full run so we're not guessing. In under 7 minutes, we can go from blank screen to a usable image.
Step 1: Open the Right Discord Channel
On the Midjourney Discord server, we can:
-
Use a #newbies-### channel if we're just learning.
-
Use a direct message to the Midjourney Bot (recommended once we're subscribed) to keep our feed clean.
To DM the bot, click Midjourney Bot → Message in the member list.
Step 2: Type Your First /imagine Prompt
-
In the message field, type /imagine.
-
Click the prompt field that appears.
-
Paste a prompt like:
a photorealistic product photo of a matte black coffee mug with steam, on a white seamless background, studio lighting, sharp focus --ar 4:5 --v 6
- Hit Enter.
Midjourney queues the job and starts rendering.
Step 3: Wait and Review Your 4 Variations
Within 30–60 seconds, we'll see a 2x2 grid.
-
Buttons U1–U4 under the image are Upscale (one per quadrant).
-
Buttons V1–V4 are Variations (new grid based on that choice).
We quickly decide: which quadrant feels closest to what we want?
Step 4: Upscale Your Favorite Result
Click U1–U4 for the version we like. Upscaling:
-
Increases resolution.
-
Adds more detail and refinement.
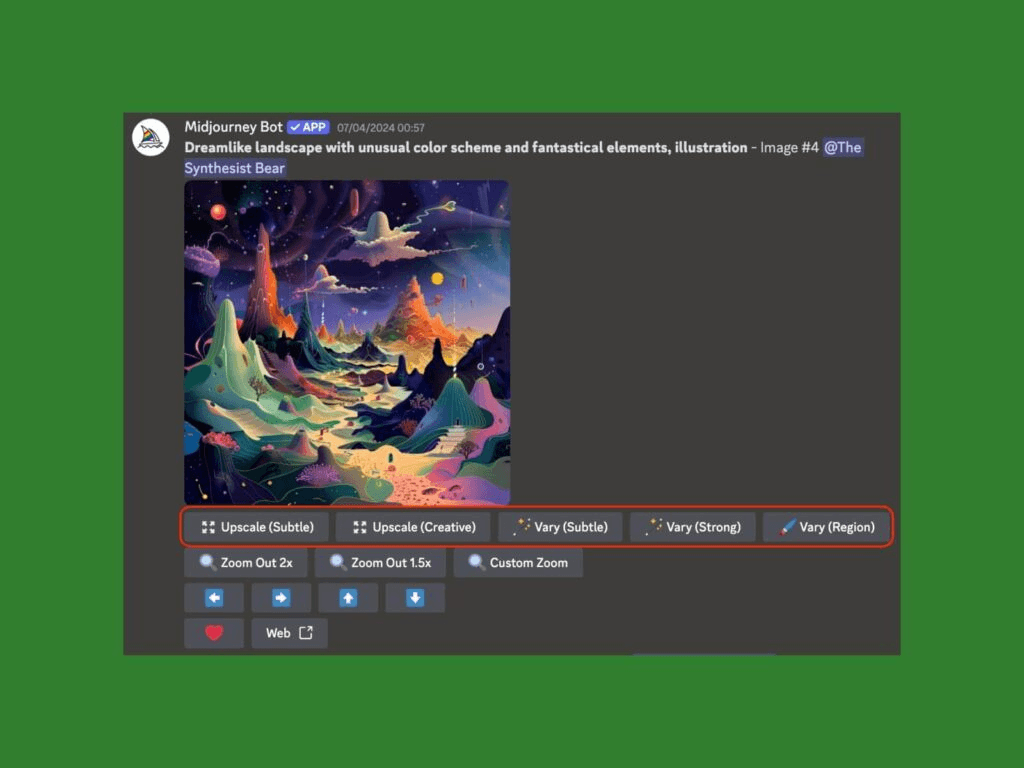
After upscaling, we'll see more options like Vary (Subtle), Vary (Strong), and Vary (Region).
How to Upscale, Remix, and Export Midjourney Images
Knowing how to use Midjourney goes beyond the first grid. The real magic is in refining and exporting images we can actually ship.
Upscaling Options: Subtle vs. Creative
Once we've upscaled an image, we'll usually see options like:
-
Vary (Subtle) – Small changes while keeping the core idea.
-
Vary (Strong) – Bigger shifts in pose, composition, or lighting.
-
Zoom Out – Creates a wider shot around the current image.
For brand work, we tend to lean on Subtle and Zoom Out to preserve consistency.
Using Vary (Region) for Targeted Edits
Vary (Region) lets us select a part of the image (like a label or background) and re‑prompt just that area. It feels like having a professional layout designer built into the AI.
Example workflow:
-
Upscale our best product shot.
-
Click Vary (Region) and drag a box over the label.
-
Prompt: "change label text to ‘Sunrise Roast' in clean sans serif font".
Text rendering isn't perfect, but v6 is noticeably better than previous versions, especially with simple, high‑contrast type.
Downloading High-Resolution Files
To export:
-
Click the image in Discord.
-
Click Open in Browser.
-
Right‑click and Save image as…
Or from Midjourney , open our gallery, click the image, and download.
The files are typically big enough for web and many print uses. For very large prints or packaging, we might still run them through an external upscaler such as Topaz Gigapixel or similar tools.
Organizing Your Midjourney Gallery
Inside the Midjourney web app, we can:
-
Add tags or text notes for campaigns.
-
Use search to find prompts or visual motifs.
-
Create collections for different clients or projects.
It feels like instantly finding all the matching pieces from a messy pile of LEGOs when we come back a month later and need a variation on an old idea.
Advanced Workflow Tips for Midjourney Beginners
Once we're comfortable with the basics, a few advanced features make our results more consistent and professional.
Using Style References (--sref) for Consistency
--sref lets us reference the style of an image URL.
Workflow example:
-
Upload a "hero" image we like for a campaign.
-
Copy its URL.
-
Use a prompt like:
packaging mockup for a new coffee flavor on a wooden shelf, product photography --ar 4:5 --v 6 --sref <image_url>
Midjourney will try to keep lighting, color, and mood consistent with that reference.
The Style Tuner: Creating Your Custom Look
Midjourney's Style Tuner (check current access instructions in the official docs) lets us generate and select style options, then save them as reusable IDs.
We can:
-
Run the tuner on a base prompt.
-
Pick 3–5 favorite style variations.
-
Use the generated style code in later prompts.
For brands, this is an effective way to get a "house style" without manual color‑grading everything in Photoshop.
Prompting for Text Rendering Success
Midjourney v6 is much stronger at text, but we still need a strategy:
-
Keep phrases short: 1–3 words per line.
-
Use clear language: "bold sans serif logo text".
-
Place text early in the prompt: "product photo focused on the label text ‘Sunrise Roast'".
In our own text stress testing, we've found v6 handles high‑contrast, center‑framed text best. Complex typography, long paragraphs, or tiny captions still benefit from manual editing afterward.
When to Use Midjourney vs. Other AI Tools
Midjourney excels at:
-
Photorealistic visuals
-
Concept art
-
Branding and product imagery
Other tools may be better when we need:
-
Precise layout control (use Figma, Photoshop, or Canva)
-
Editable vector logos (traditional design tools)
-
Multi‑page documents (InDesign or alternatives)
We get the best results when we treat Midjourney as our idea generator and visual engine, then finish details in familiar design software.
Troubleshooting: When Midjourney Doesn't Work as Expected
Even when we know how to use Midjourney well, things sometimes break or behave strangely. Scenario‑based debugging saves time.
"Job Queued" Forever → What to Check
If a job seems stuck:
-
Run /info to see if we've used all our fast hours.
-
Switch to Relax mode in /settings if we're not in a hurry.
-
Check status for outages.
Heavy traffic can slow down response times, especially after big feature releases.
Prompt Rejected or Flagged → Common Causes
Midjourney automatically filters content based on community guidelines:
-
Realistic depictions of public figures
-
Graphic or unsafe content
-
Certain trademarked or restricted terms
If a prompt is rejected, we can usually rephrase it to focus on style, mood, or generic roles instead of specific people or brands. Midjourney's Terms of Service and safety guidelines outline these rules in more detail.
Results Don't Match Your Vision → Adjustment Strategies
When outputs feel "off," we adjust methodically:
-
Simplify the prompt – Too many adjectives can dilute the focus.
-
Change aspect ratio – Composition changes a lot between 1:1 and 16:9.
-
Lower stylize / chaos – For more literal, reliable images.
-
Provide references – Add image URLs or use --sref for lighting and style control.
Here's where it gets interesting: small prompt edits often have bigger impact than switching models or tools. A focused subject line and a clear style phrase can immediately tighten results.
How to Use Midjourney FAQ (2025)
Is Midjourney free to use in 2025?
As of December 2025, Midjourney generally requires a paid subscription to generate images. Occasionally they run limited trials, but for reliable everyday use we should plan on at least the Basic plan. Pricing details are on the official Midjourney account page.
Can I use Midjourney images commercially?
On paid plans, Midjourney usually grants commercial usage rights, but the specifics depend on our subscription level and jurisdiction. We should always:
-
Review the latest Terms of Service on the official site.
-
Check any client contracts that involve AI‑generated assets.
When in doubt, we document that an image was AI‑generated and keep the original prompt and job ID from /info.
How long does it take to generate an image?
Under normal load, v6 images usually take 30–90 seconds per job in Fast mode. In Relax mode or during heavy traffic, this can stretch to a few minutes. Upscales add a bit more time, but a full "prompt → final upscale" workflow generally fits inside 5–7 minutes.
**Updated: December 2025, Midjourney features and pricing can change. **
For the most accurate information, it's always worth checking official documentation, release notes, and trusted analysis sources like the Midjourney docs, model cards from related research labs (e.g., arXiv), and well‑maintained AI review blogs.
If we treat Midjourney as a practical tool in a broader design workflow, rather than a magic button, its learning curve flattens quickly. With a handful of commands, a clear prompt strategy, and a bit of troubleshooting know‑how, we can go from overwhelmed to confidently producing images that are ready for clients, campaigns, and our own creative projects.