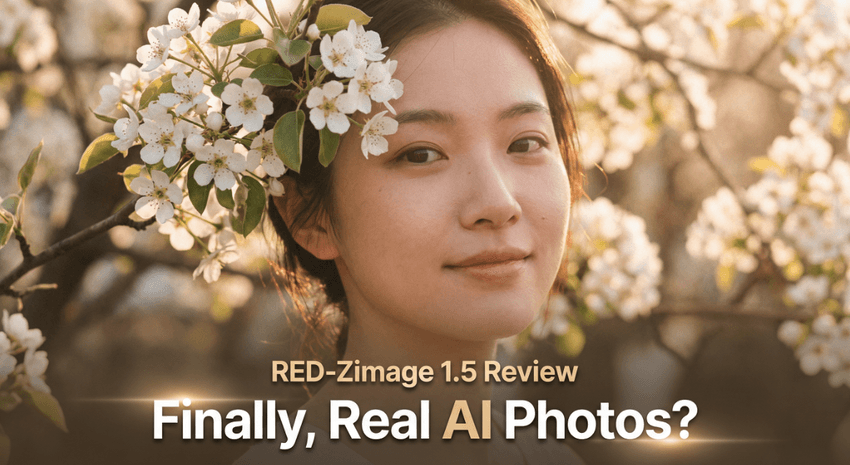
When creators ask me how to get true midjourney realistic portraits, they're usually frustrated. The skin looks plastic, the eyes feel "off," and the lighting doesn't quite match what a real camera would do. Since Midjourney v6 landed, I've been stress-testing it specifically for portrait work, and it's finally reliable enough to replace a lot of traditional photoshoots in my workflows.
In this guide, I'll walk through how I actually prompt and refine Midjourney realistic portraits: lighting choices, lens simulation, skin texture, posing, and post-generation retouching, plus the ethical lines I don't cross.
Why Midjourney v6 for Realistic Portraits
What Makes v6 Different for Portrait Work
Midjourney v6 made a noticeable jump in facial structure stability and fine detail, especially around eyes, teeth, and hair edges. I see fewer melted features, more consistent eye alignment, and a better sense of depth in the face.
For portraits, that matters more than raw "sharpness." v6 tends to:
-
Interpret photographic keywords more faithfully ("85mm lens", "shallow depth of field", "cinematic lighting").
-
Handle subtle texture like pores and fine hair without turning them into muddy noise.
-
Respect anatomy better when you keep poses simple and camera distance realistic.
Here's where it gets interesting: if I give v6 a prompt that reads like a real photography brief—subject, lens, lighting, backdrop—it behaves more like a virtual camera system than a generic image generator.
When v6 Outperforms Traditional Photo Editing
There are cases where I'd still choose a real camera, but v6 wins when:
-
I need 5–10 different portrait concepts of a fictional or generic person in less than an hour.
-
The brief requires styling, sets, or locations that would be too expensive to produce practically.
-
I'm exploring concepts (moodboards, ad mockups) before committing to a costly shoot.
Instead of fixing a flawed photo in Photoshop, I'll often regenerate in Midjourney with a slightly refined prompt. It feels like having a professional layout designer built into the AI: I iterate at the concept level, not just at the pixel level.
For background on the model's capabilities and limitations, I track updates through the official Midjourney documentation and community notes.
Lighting Guide: The Foundation of Realistic Portraits

Natural Light Setups (Soft Window Light, Golden Hour)
If your lighting prompt is vague, your portraits will look vaguely "AI." I start every serious portrait with a clear lighting scenario.
For soft, flattering realism, I'll use phrases like:
-
"soft window light, overcast day, near a large window"
-
"golden hour sunlight, warm backlight, soft shadows on face"
Natural light works well for lifestyle, editorial, and casual portraits. If I want believable skin and gentle contrast, I mention direction: "window light from the left, soft falloff". Midjourney v6 responds by shaping the face more like a real light source would, with a clear highlight side and shadow side.
Studio Lighting Keywords (Rembrandt, Butterfly, Split)

When I need something that looks like a studio shoot, I switch to classic portrait lighting patterns:
-
Rembrandt lighting for a cinematic, slightly dramatic look (triangle of light on the shadow cheek).
-
Butterfly lighting (light above and in front) for beauty, makeup, and older skin where I want smoother texture.
-
Split lighting (one side lit, other in shadow) for moody, character-driven portraits.
I pair these with "studio background," "seamless backdrop," or "gray paper backdrop" so the model doesn't invent distracting environments. This tends to produce images that look like they came from a controlled studio setup.
Advanced Lighting Modifiers (Softbox, Ring Light, Backlight)
When I want more control, I bring in gear language:
-
"large softbox, close to subject, soft diffuse light"
-
"ring light reflection in eyes, beauty close-up"
-
"strong backlight, subtle rim light on hair, fill light on face"
The key is not to stack twenty modifiers. Two or three precise lighting instructions are usually enough. Overloading the prompt often leads to confused shadows and fake-looking highlights. For deeper understanding, I still refer to traditional lighting guides from DPReview and Fstoppers' portrait lighting tutorials: Midjourney behaves much closer to real-world rules than most people expect.
Lens Selection Guide: Matching Camera Perspective
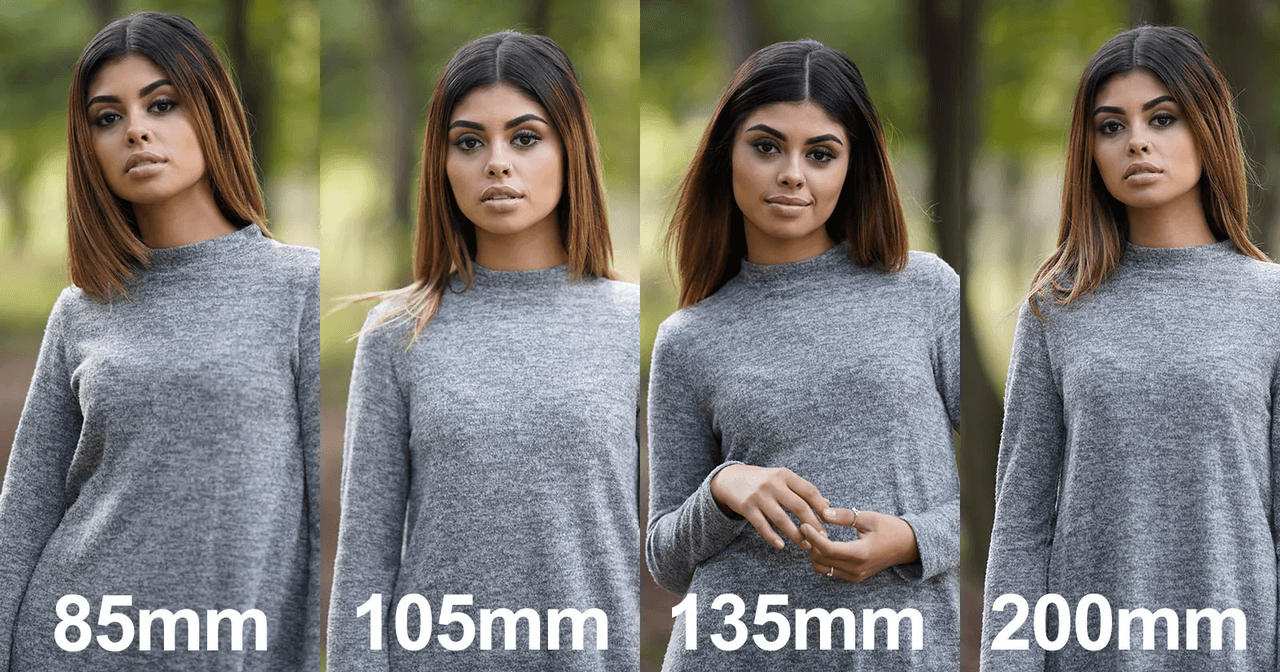
Portrait-Standard Lenses (50mm, 85mm, 105mm)
Perspective is the silent killer of realism. If you don't guide Midjourney's "virtual camera," you'll get warped faces.
For believable portraits, I stick to lens language like:
-
"shot on 50mm lens" for environmental portraits or half-body shots.
-
"shot on 85mm lens" for classic head-and-shoulders portraits.
-
"shot on 105mm lens" for compressed, elegant beauty shots.
In v6, these keywords significantly affect head size vs background size and how features sit on the face.
Why Focal Length Matters for Face Proportions
Wide lenses (24–35mm) exaggerate noses and foreheads, especially up close. That distortion reads as "off" even if you don't consciously see why.
By prompting "85mm lens, eye-level angle", I get more natural proportions: normal nose size, non-bulging eyes, and a pleasing compression that feels like a studio portrait. This mirrors real-world advice from portrait photographers on PetaPixel, and Midjourney tracks these principles surprisingly well.
Depth of Field Control (f/1.4 vs f/5.6)
The aperture keywords "f/1.4" or "f/2.0" signal shallow depth of field: sharp eyes, blurred background, creamy bokeh. I use these when I want the viewer locked onto the subject's face.
For group portraits or fashion where I want more background detail, I might say "f/5.6, more background detail, less blur". If everything is razor sharp front to back, the result often looks more digital than photographic, so I usually bias toward some background blur for single-subject portraits.
Skin Texture & Material Settings

Achieving Photorealistic Skin (Pores, Subsurface Scattering)
Artificial-looking skin is one of the fastest ways to break realism. I lean on wording that references texture and subtle light behavior:
-
"natural skin texture, visible pores, gentle imperfections"
-
"soft subsurface scattering, realistic skin tone, not overly smooth"
Subsurface scattering is the way light penetrates skin and scatters just beneath the surface. When v6 responds to that phrase, cheeks and noses get a slight, realistic glow instead of flat plastic shine. You'll see similar concepts discussed in CGI rendering guides on CGSociety, where subsurface scattering is a fundamental technique.
Age-Appropriate Texture Adjustments
For older subjects, I don't hide age. I'll explicitly ask for "age-appropriate wrinkles, natural lines, subtle under-eye texture". If I'm vague, Midjourney tends to "beautify" by default.
For children and teens, I dial it back to "smooth young skin, subtle pores, no heavy makeup". Age cues are incredibly sensitive: if the skin doesn't match the implied age, the portrait can feel uncanny.
Common Skin Rendering Mistakes to Avoid
A few prompt patterns consistently cause problems in my tests:
-
Stacking "hyper-realistic", "ultra-detailed", and "8k HDR" often leads to gritty, over-sharpened skin.
-
Asking for "perfect flawless skin" usually removes all pores and turns faces waxy.
-
Combining heavy beauty lighting with extreme texture can make the image look more like a 3D render than a photo.
I aim for "realistic, cinematic, natural skin texture" and let v6 balance sharpness with softness. If the first result is too smooth, I'll regenerate with added phrases like "fine peach fuzz, subtle pores".
Posing & Composition Techniques
Natural vs Directed Poses
Midjourney defaults to slightly staged poses if you don't specify otherwise. When I want candid realism, I'll say "natural, relaxed pose, caught mid-moment, unposed".
For advertising or editorial, I move to more deliberate phrasing: "posed 3/4 view, shoulders turned, chin slightly down". Short, specific pose notes usually beat long descriptive paragraphs.
Eye Direction and Engagement
Eyes sell the portrait. If they're drifting, the whole image feels strange.
I use clear instructions like:
-
"looking directly into the camera, strong eye contact" for engaging, intimate shots.
-
"gazing off-camera to the right, thoughtful expression" for narrative or cinematic vibes.
Here's where it gets interesting: changing only eye direction and expression often transforms a technically good image into something emotionally believable.
Body Language Keywords That Work
Instead of vague emotion words, I've had better results with posture and gesture:
-
"relaxed shoulders, slight smile, soft expression"
-
"confident stance, arms loosely crossed, subtle smile"
-
"hands gently touching face, introspective mood"
These cues give Midjourney concrete physical targets. Emotional keywords then fine-tune the mood instead of trying to carry the whole pose alone.
Post-Generation Retouch Workflow
When to Use Vary (Region) for Facial Refinement
Once I have a strong base portrait, I rarely start over. Instead, I use Vary (Region) on:
-
Eyes that are slightly misaligned or asymmetrical.
-
Mouths or teeth that feel off.
-
Small clothing or hair artifacts near the face.
I keep the selection tight around the problem area and repeat with minor prompt tweaks like "correct anatomy, keep same lighting and composition". This preserves the overall look while fixing local issues.
Upscaling Strategy for Print-Ready Portraits
For print or large web use, I:
-
Generate at a standard size (e.g., 1024x1024 equivalent).
-
Use Upscale (Subtle) first to avoid inventing fake texture.
-
If needed, run the file through a dedicated upscaler (like Topaz Gigapixel or Photoshop's Super Resolution) rather than hammering Midjourney alone.
This keeps the portrait clean and avoids that crunchy oversharpened look that appears when you stack too many aggressive upscales.
Combining MJ Output with Photoshop Touch-Ups
For professional work, I almost always finish in a traditional editor:
-
Minor dodge and burn to sculpt facial features.
-
Color grading to match a brand palette or campaign style.
-
Gentle skin retouch (frequency separation or simple healing tools) while keeping natural texture.
Many retouching techniques from Adobe's official portrait photography tutorials translate directly to Midjourney outputs. I treat the AI image like a raw file from a camera: a strong starting point, not a finished product.
Ethical Considerations in AI Portrait Creation
Transparency in AI-Generated Portraits
With midjourney realistic portraits getting close to real photography, I'm deliberate about disclosure. In client contexts, I label concepts as "AI-generated reference" or "AI concept art" so there's no confusion about how the image was created.
In public-facing work, I lean toward being clear in captions or project notes that Midjourney was part of the workflow. That builds trust and avoids the sense that I'm passing synthetic people off as real models.
Avoiding Bias in Facial Feature Rendering
AI models inherit biases from their training data. Left on default, Midjourney can overrepresent certain beauty standards or demographics.
To counter this, I:
-
Explicitly specify age, ethnicity, and body type when it matters to the project.
-
Vary prompts across a campaign so I don't unconsciously repeat the same face type.
-
Watch for stereotyped expressions or styling and regenerate when necessary.
I also avoid using AI to imitate real, identifiable individuals without consent, even if the tool allows it. That's not just a technical question: it's a trust and respect issue.
These practices align with Google's AI Principles and the evolving E-E-A-T guidelines for 2025, which increasingly emphasize transparency and responsible AI use in content creation.
If you build these ethical checks into your workflow from the start, you can use Midjourney v6 to create powerful, realistic portraits without blurring important human boundaries.
Tested as of: December 2025
Last Updated: December 3, 2025
If you're experimenting with these techniques and run into specific portrait issues—skin, lighting, or text in the scene—share a prompt example and what you were aiming for. I'm happy to dissect the reasoning behind why Midjourney behaved the way it did and suggest targeted prompt adjustments.